
I would love to sit down with the builder of this house and ask him some questions like, "Why did you think people would be attracted to bright brass door knobs, when any another finish is infinitely better?" or "Why did you make our deck the size of a postage stamp when it wouldn't have cost much more to make it usable?" or "Why didn't you caulk around any of the moulding? Are you afraid of using the caulk gun? Because it isn't a real gun, you know." But mostly, I would like to know what gene exists in builders that they go the the lighting department and say, "You know what I think a buyer would like? A buyer would like a light shaped like a woman's breast. Yep. Nothing says welcome home like a boob light."

We have had them in all three homes we've owned, and so have nearly all of our friends. Nothing that resembles private anatomy should be a fixture in a home.

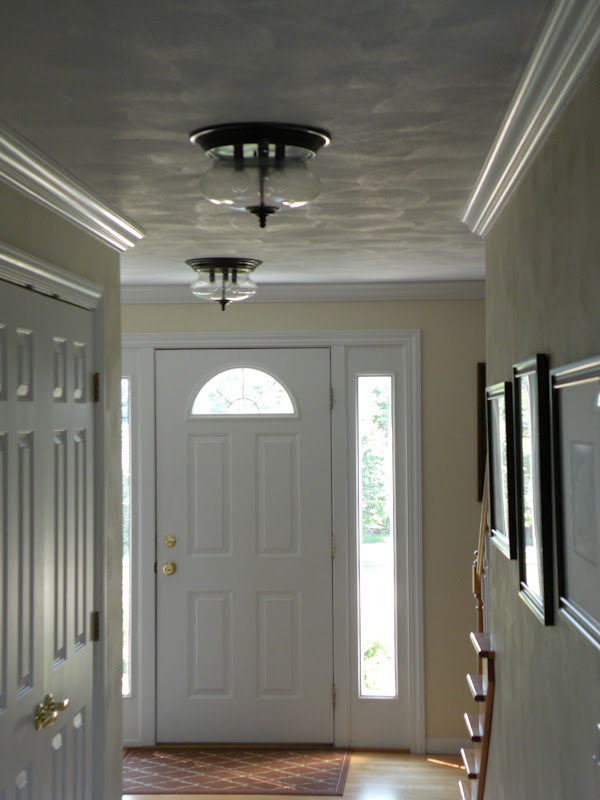
There are two of these in offenders at the entry of the house. We don't have a grand foyer, so replacing them with a chandelier wasn't an option. I have been trying to figure out a way to use what we have and make them more attractive, and came up with the idea of taking off the glass globes and attaching drum shades upside down to get a look kind of like this, but the size I would need isn't readily available and is very expensive. This was not an area where we wanted to spend a lot of money, so that was out.
And so they have remained untouched.

The more I looked at the lights, the more I realized I kind of liked the shape of the globes {they are't as offensive as most boob lights} and that they're clear and not cut and/or frosted glass. It was the brassiness combined with the boobiness that I had a problem with.
We decided to take a chance and paint them with Old Rubbed Bronze spray paint and see if we liked them better. Then I got to thinking it might be helpful to do a tutorial on how to remove and replace a light fixture, and this is the conversation with Handsome Hero that followed.
I said, "I think it would be really helpful to explain how to do something like this. What do you think?"
Handsome Hero looked at me in complete innocence and said, "It wouldn't be interesting. Anyone who can't figure out something this simple is an idiot."
To which I replied, "Dear, I don't know how to do it. That's why you're doing it."
To which he thought about how to answer and said, "...."
To which I snarkily replied, "Just explain it, Bucko."
How to remove and replace a light fixture
Before you do anything, turn off the breaker. Best to do this during the day so you can see {um, you knew that, right?}.
1. Remove the globe. The tip {called the nipple. No, I'm not kidding} unscrews, but be careful because it is usually in more than one piece.
2. Now unscrew the base.

This is what you should see. One of the lights had no insulation {fire hazard!}, so I ran to ReStore and bought a light for $4 so that we could pilfer its insulation.

When you pull the light down, you'll see all these wires. This is where I get nervous, and have visions of blowing up the house if the wrong wires are put together, but it's simple logic when you know what to do. The wires all go with like wires. White with white, copper with copper, etc. Common sense, right?

Take off the wire bolts {the plastic thingies on the ends}. You'll see the wires are all twisted together.

Unravel the wires and pull down your light,

and, if you are going to turn your breaker back on before you replace the light, twist the wire bolts back on. It also keeps them from getting lost.

When you're ready to paint, make sure you tape off all of your threaded areas and sockets. If you have burned-out lights, just leave them in the sockets and you can be sure no paint will get in.

I needed to get all the way around these rods that attach the nipple {sorry} to the base, but didn't want paint to get into the threads or they might not screw back in well, so I taped them and leaned them up against some recycling stuff.

I realized as I was about to start that I forgot the screw in the middle below. Be careful about that stuff because once the paint is in there, you can't screw anything into them.

Now paint in even, thin coats so you don't get drips. It only took me two coats to get full coverage.

Let them dry all day or overnight to cure so that your globe doesn't stick and take off paint when you have to replace your next lightbulb. When you're ready to re-attach, separate all of your like wires from the ceiling {all the white, all the copper, etc.} and twist them together again with the wires from the light. Put on your wire bolts, making sure no wire ends are exposed. Then simply reverse the steps you used to get the light off.

Voila!

Much better! I don't mind the boobiness anymore with this updated color.

A definite improvement that cost $9: five for the spray paint {it took less than one can for two lights} and four for the sacrificial light used for insulation.

Handsome Hero thinks they look colonial, and I must say, there is something rather old world about them.
Think you'll attempt this at home?
They look so much better!
ReplyDeleteI have to say, when I saw your post come through my FB feed I was intrigued. Enough to let a baby cry as I had to figure out what you were meaning by Boob Lights. You could say, you had me and boob LOL!
ReplyDeleteP.S. They do look infinitely better ;)
ReplyDelete